Pages

Thursday, January 8, 2015

Gingerbread House Tutorial

Hello there again! How are you? We are doing fine here. A bit chilly--no, scratch that--we're down right cold! On the upside, my handsome hubby got an extra day off of work today because of the cold. :o) Great day for snuggling and hot cocoa.

I know it's a little late for Christmas, but, honestly, it's never too early to start planning for next year. In fact, I'm hosting a Homespun Christmas 12 Month Challenge over on my craft blog to help make things a bit easier next year. There's always so many fun activities going on around Christmas, that I am hoping to get as much of the prep work and crafts done ahead of time to leave me more room for family fun. Feel free to check it out and join in the challenge.

One of things we do every year is make a gingerbread house. Actually, I bake and assemble 20+ houses. I don't decorate them all though. The kids at church get to decorate them after their Christmas play practice. It's always a lot of fun, and I've learned some tricks to make it easier over the years. Making gingerbread is a bit messy, but Michelle volunteered to keep her hands clean and take photos for me of the process.  How about I share them with you? Consider it an early Christmas gift from us to you. You're welcome. :o)

First off, I start by making up the gingerbread dough. I've tried several recipes over the last couple of years and I think I've settled on one I like the best. I had some criteria I was looking for as I searched for recipes. First off, it couldn't call for a lot of expensive ingredients. My original recipe called for 6 eggs. That's a LOT of eggs when you have to make 5 or 6 batches of dough. I also didn't want to use butter or a lot of molasses. I wanted the houses to taste good, but honestly, the houses are usually so stale by the time the kids eat them (if they do), I doubt they would taste that great even if I had used the most expensive ingredients available. I also did not want a recipe that had to be refrigerated before rolling it out. I never know exactly how many batches I need to make and don't want to have too much, or have to wait for another batch to chill.

I didn't get pictures of all the steps, but I figure you know how to mix up cookie dough, which is pretty much what this is.

Start by preheating your oven to 350 and placing a non-skid mat (shelf liner) under your cookie sheet to keep it from sliding around while you roll out the dough. You need a sheet that only has one raised side. If you don't have one like this, try turning your regular cookie sheet upside down. It makes it easier to roll the dough directly on the sheet.

Once you've made up your dough (recipe is below), place about a third of it on your well sprayed cookie sheet. Flatten it out a bit with your hands and sprinkle a generous amount of flour to keep it from sticking. You can see that it looks pretty crumbly on the edges. As long as it comes together as you roll and pat it, it's fine.

Roll the dough out to about 1/8 inch thick, covering as much of the cookie sheet as you can.
I use a piece of PVC pipe as a rolling pin to flatten out the dough near the raised edge.
Using a pattern, or these totally awesome cutters from Wilton, cut out your pieces.
Butt the pieces right up next to each other.
Once you've cut as many as will fit on the sheet, remove any extra dough and put it back in your bowl to be re-rolled later.
Bake them for 10-12 minutes. As soon as they come out of the oven, re-cut them with your patterns or pieces. You will have to work pretty quickly, one because the dough hardens up as it cools, and 2 because your hands will get pretty hot working on the hot dough.
Here you can see where the dough has expanded a bit so re-cutting helps to keep your pieces the size they need to be to assemble correctly.
Optional-hire one of your young'uns to help with some of the clean-up between batches. ;o)
Keep re-rolling the dough, cutting and baking till you're almost out of dough. I usually use the last bit to cut out a bunch of people. These I cut on the counter and transfer to the cookie sheet. It's MUCH easier than trying to pick out all the little extra pieces from between the people.
A little foot note here, it took me about 5 hours one afternoon/evening to make 6 batches of dough and bake pieces for 26 houses. I also have 2 cookie sheets, so while one is baking I can roll another out. I take all the pieces over to the church (where the decorating fun happens) and assemble them there the day before the party.

I forgot to get photos of the assembly process, so maybe next year I will update this with more photos of that. I have included the recipe for the frosting glue to hold the houses together. I will say that you should stock up on some cake circles or rectangles. I used to cut cardboard squares and cover them with foil every year. I began to realize that my time was worth more than the little extra I spent on the cake circles (I've since found that you can get them pretty cheap on Amazon-this batch should last me a couple of years). I also found that the houses would often pop off the foil, but they tend to stick to the bare boards better, and since they're white, the kids can pretend it's snow. Win-win.

Here's the houses all lined up and ready for the kids. I provide the houses and the bags of frosting, but the kids are asked to each bring a bag or two of candy/cereal to use for decorating. I divide the unwrapped candies into disposable plates or bowls, and the wrapped candy is just spread out along the table. I usually set this up while the kids are practicing.
I make the frosting the day before and put it in disposable bags with a rubber band on the open end. You can see why in this photo. :o) I don't cut the tip off the bag until they are ready to start decorating, royal frosting crusts and hardens up pretty quick. When they finish their lunch, they come to see me, I cut the tip off a bag for them, and they are off and having fun. I also usually have a label with their name on it to put on the board of their house to help prevent any squabbles later. 
This photo was from a couple years ago, but it's a good shot of the bag.
 After all that work, and the following clean-up, your last step is to...
I guess that's about it. Hope you enjoy this little (or not so little) tutorial, and hope you get a chance to make some gingerbread houses next year. One batch of dough makes about 4 houses. Maybe your littles could invite a friend or two over for a fun afternoon. 

Gingerbread dough (makes about 4 houses using the Wilton gingerbread house cutters)

  • 5 cups all-purpose flour
  • 1 teaspoons ground cinnamon
  • 1 teaspoons ground ginger
  • 1/2 teaspoon ground cloves
  • 1/2 teaspoon baking soda
  • 1/2 teaspoon salt
  • 1 cup vegetable shortening
  • 1 cup sugar
  • 1/2 cup molasses
  • 2 eggs

  1. Preheat oven to 350. Place your cookie sheet on top of a non-skid mat (shelf liner) so it won't slide all around on you while you're rolling the dough out. Spray it well with cooking spray.
  2. Combine dry ingredients in a large bowl. 
  3. In another bowl beat the shortening and sugar until creamy. Add the molasses and eggs and combine well. Slowly stir in the dry ingredients. Your dough will probably look kind of crumbly, that's OK. 
  4. Take about a third of the dough out and place it on your cookie sheet and use your hands to flatten it out a bit. It probably won't look very pretty. Sprinkle a generous amount of flour on top. Using a rolling pin and plenty of flour, roll the dough out over as much of the cookie sheet as you can. I usually try to cover the whole thing until I get to the end of my batch of dough and it just won't cover that much. You want it to be about an 1/8 inch think. 
  5. Using patterns or cutters (this is TOTALLY the way to go if you're making a lot) cut out your pieces making sure you butt the pieces right up next to each other. This will help it from spreading out too much and getting out of shape. Once you've gotten as many shapes as you can on your cookie sheet, remove the extra dough and put it back in the bowl. 
  6. Bake for 10-12 minutes or until lightly browned around the edges. The dough will have expanded slightly, so you need to re-cut your pieces as soon as they come out of the oven while the dough is still soft (this is where having cutters is really nice). Remove to a wire rack to cool. The pieces will harden up as they cool. (Any extra cut off pieces make yummy snacks while you're working. ;o)
  7. Repeat the rolling, cutting, baking sequence with the remainder of the dough. 

Royal Frosting (Fills 6 bags)
  • 6 Tablespoons meringue powder
  • 2 lbs powdered sugar
  • just less than 2/3 cup water
Place all ingredients in a stand mixer and whip for several minutes (5-7). This is slightly softer than most meringue recipes, but I wanted it to be easy for the kids to squeeze out of the bags. 

Till next time...
God's love and blessings!

Monday, January 5, 2015

MineCraft Birthday Party

Hello there! This new year organization stuff is pretty awesome. I've set aside some time for me to blog during the week, and it's working! I'm actually sitting down and doing it. :o) Of course, school starts back up tomorrow and life goes back to it's usual busy-ness, so we'll see how well I can keep up with this schedule then. 

Anyway, I promised a little while ago that I would share some pictures from Michelle's 11th birthday party, so here it is. As the title says, it was a MineCraft theme, and for those of you who have no idea what that is, it is a computer/video game where you build things. I kind of see it as a mix of Legos and Survivor in one game. You're given basic materials and you have to use them to build stuff to protect yourself from the bad guys. It has distinct graphics in that it is pixelated. Everything is a block, or made up of blocks. 

I would love to give credit where credit is due for the many things I printed off for this party, but to be honest, there are so many resources on the web, and I pulled things from LOTS of different websites that I can't remember what I got from where. If you simply google, or go to Pinterest and look for MineCraft party, you will find a ton of ideas and resources. The hard part was narrowing down to things I thought would work for us. 

Here was our buffet.That's the cake in the middle.
The green background is just a disposable table cloth that we hung from the ceiling to the half wall of the stair well. This gave us a backdrop for the buffet. 
I think I ordered the grass stuff from Amazon. It was fun to play with. :o) The decorations in the middle of the table I got from Pixel Papercraft. It was super easy. You find the item you want, print it, cut it out, fold it up and glue it. Because most of the items are all cubes, they're pretty easy to assemble. Oh, and it's FREE. 
 Here's another shot of the buffet. It was pretty easy to find food items to match many of the items used in the game (chicken, melon, strawberries, apples, etc).
 Michelle made these to give to her friends in their goody bags. They represent different items or creatures in the game. My personal favorite was the cake on the bottom. :o)
Our son, Nick gave this cardboard Steve head to Michelle a while ago, and it was the perfect blind fold for our game of pin the tail on the Ender Dragon. We just made the girls put it on backwards. For those who don't know, Steve is the main character in the game.
No, I didn't remove all the coats and shoes to make the photos look nice. Oh well. This is real life at our house.
 This was another one of our games, although they didn't end up using the Steve head after this photo because they couldn't see a thing out of it. We cut a Creeper face out of a box and spray painted it green. My original idea was to make bean bags for the girls to toss into the holes, but never got around to making them. Michelle pulled out her nerf bow to use instead. I think it worked better than the beanbags would have.
So, this was the cake. It was kind of crazy to make. I ganached the square cake like I usually do before covering it in fondant, but this time I covered in in sheets of wafer paper that I printed from the Pixel Papercraft blog. I simply re-sized the images to fit  the cake, printed them and "glued" them to the ganache with piping gel. Next time I would definitely use more gel around the edges as it began to peel toward the end of the party. Everything on top, except the tree, was fondant covered in more printed wafer paper. The tree was rice crispy treat. It was quite fiddly to wrap the paper around the fondant, but probably a lot easier than hand painting or piecing little tiny squares of fondant. I even stuck a birthday candle in the dynamite for effect.
 The girls seemed to like it. :o)
Here's a shot of some of the characters before I put them on the cake. 

I have to share this last shot with you. This was the first problem Michelle had for math on the Monday after her party. We got a good laugh out of it. Michelle is still wondering where her gift is from Steve. :o)
Well, I better close this here. I've got a bit more work to do at my desk before heading off to bed. 

Till next time...
God's love and blessings!

Saturday, January 3, 2015

2014 Year in Review (Part 2)

I'm back! Didn't want to leave you hanging in suspense for too long. ;o) I finished the last post with June, so I'll start off here with July 2014. That makes sense, now doesn't it?

In July, Michelle and I went to our first week of camp. Here we are on the first day. I guarantee we didn't look this chipper on the last day, but we sure had a lot of fun!


As with every other summer since we've been here, I spend a good part of it out picking berries on our property. We didn't have nearly as much as last year, but still enough to make some jam and syrup with. Yum!!

In August I finally got around to a project I'd been wanting to do for several years. Here's a sneak peak of the beginning of it. You'll have to check back in a couple of weeks to see the finished project. I LOVE how it came out.

August was also my handsome hubby's first official day as a teacher. I'm so very proud of him and all the hard work he's done to get here. Had to get a picture of them both on their first day of school.

September is Michelle's birthday, and this year we celebrated her 11th with a MineCraft party. I know I mentioned it in a previous post, but I will tell you all about it in another post. There's too much to share here.

September is the beginning of our fall here and I love to walk up the street to the neighbor's yard and get photos. Those trees remind me of a big quilt.

It was also the month we welcomed a new member into our family. This is Smokey, and if you are friends with me on Facebook you already know how silly this guy is and some of the antics he gets into. Maybe I'll have to do a post on that someday too. ;o)

October was spent enjoying the beautiful fall and working on school work. Yes, we ALL work on school around here.


This was the year for weddings for us. November we traveled down to Texas for our niece's wedding. Mike wasn't able to come, but our son and his bride came along. I'm so glad they did as I recruited Romni to help me with the cake. She was awesome, and Nick was the navigator for me as we transported it through the cities to the venue. His prayers and support definitely helped calm the nerves of this nervous cake decorator.


And now we get to December. This is always a busy month for everyone, but now that handsome hubby is a teacher, we get a week and a half of vacation time in there which is REALLY nice. Michelle even talked him into a sled run or two one afternoon with her.

This is my 6th year doing gingerbread houses for the kids at church. I had my assistant (Michelle) take photos while I worked on them this year so that I can type up a tutorial later, you know, in case you ever feel the need to make 20+ gingerbread houses.


We've enjoyed having Angel and Tyler home for a couple of weeks before they move off to Hawaii this month. Looks like we need to save some money up so we can go visit them next winter. ;o) We've enjoyed decorating cookies, going out to celebrate family birthdays, and making lefse together. Fun (and yummy!) We're sure going to miss them when they go. :o(

All my babies in one place=happy mama. :o)


I will close this here. I so enjoy being able to look back over the year and see the many blessings He has bestowed on us. So grateful for His watch care over us and His amazing provisions. We are truly blessed and never want to take that for granted.

Til next time...
God's love and blessings!

Friday, January 2, 2015

2014 Year in Review (Part 1)

 Happy New Year!! Wow, another 365 days gone by way too fast. For my friends and family who don't live close by and might be interested in what's going on around here, here's a little year-in-review post for you. I will split it up into 2 posts as I have too many photos to share in one. ;o)

January was cold...REALLY cold. We had a lot of ice in the house on windows and walls. This year we made sure we got the plastic up on the windows, but we will probably need to replace them in the future. I also got to take some fun engagement photos for my son and his bride.


Aren't they cute?
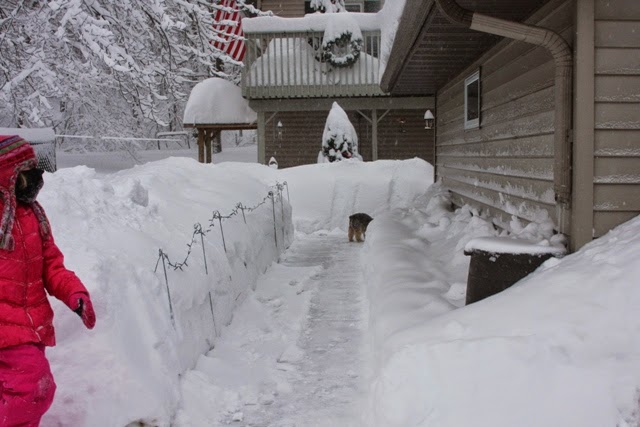
February came in with snow...LOTS of snow. This was the most we've seen in the 5 or so years we've been here.

Gotta make sure the gas man can get to the tank.

Yes, that's a Christmas tree and wreath still up. There's a horse and sleigh  decoration somewhere under the snow on the left. We lost it till April.
If you gotta shovel snow off the roof, you might as well make it fun.
We also had a lot of these around the house. When it's too cold to go out, you find something to keep yourself busy, and these kept her busy quite a bit. 

While March brings spring to most of the country, not for us, so our church makes the most of it and plans our annual snow soccer game then. Yep, we're that crazy. Well, I'm not exactly. I stood in the warm building and took these shots through the window. 


He came up to the window to show me his icicles. The fogginess of the photo is due to the steam coming off his body. :o)
April was Resurrection Sunday, and snowman building. Doesn't everyone build a snowman in the spring? 

 May was super busy. It started with a trip to Colorado to celebrate a wedding for my nephew. This picture of the bride getting ready should tell you how much fun this wedding was.


I will post more photos of this cake on my cake blog later this month.
 The following week we were back home and preparing for our own son's wedding. Here's a picture of the cake. The topper was the bride's grandmother's.

There was a little surprise on the back for the groom. 
They are such an awesome couple. It's so much fun having a daughter-in-love who likes to craft with me. ;o)

And just so you don't think we are in snow all year, here's a shot of my garden in June. See, we did finally get those Christmas decorations put away. :o) 

I will close this post here and finish up the year for you tomorrow. 

Till next time...
God's love and blessings!