Pages

Monday, October 5, 2015

Happy Fall!

Wow! It's fall already. What happened to the summer? I must have blinked again. Actually, we were having lots of fun this summer now that Handsome Hubby has his summers off. We had several home improvement projects to get off the Honey-do list and we took a couple of mini vacations, but mostly, we just enjoyed each other's company.

I did remember to take photos of several of our trips, but I won't bore you with all of them at once. Today I thought I'd share some of my favorite photos from our trip to the North Shore. The first day we were there we stopped at Gooseberry Falls and did a little hiking. It was a beautiful 70 degree day in August. Loved it.


 I even managed to get in front of the camera for a couple of shots.


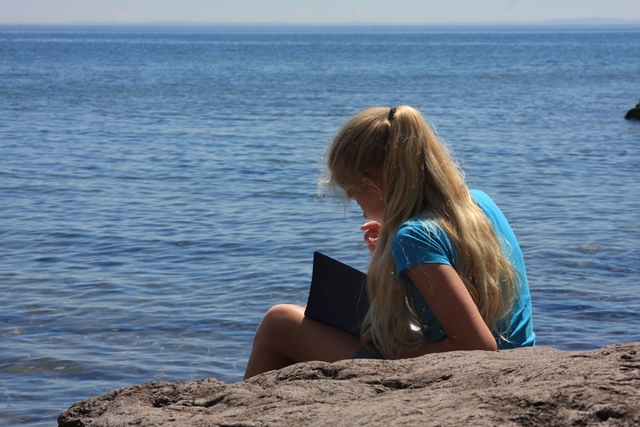
This one has really gotten into journaling lately and made us stop several times so she could sit down and write or draw which was perfectly fine with us. We like taking things slow. :o) 


The next day we stopped at Iona's beach for some more exploration. This is a place you really have to see in person, pictures just can't quite explain it. In this photo you can see that the beach is made up of pinkish rocks. They look pink when they're dry, but more of a reddish when they are wet. What you can't tell by the photo is their sound. They kind of tinkle like wind chimes when you walk across them. It's pretty cool. 


It's hard to see in this photo, but all the rocks on the beach come from the cliff you see in the upper right of the photo. As that cliff crumbles, the rocks fall into the lake and the current carries them to the beach. We didn't see these rocks on any of the other beaches along the shore, just this one. You can't see the beach from the road. You have to follow a trail from one of the boat access places. Along the way there's a billboard that explains some of the history of the beach. 


I think our favorite stop for the weekend was the Split Rock Light House. We got to walk the grounds, hear the history of the place, and tour the Keeper's House and Light House. 


 What an AMAZING view!


 There was a bit of climbing involved.


 I just love the details we used to put into everyday items to make them pretty. Isn't this gorgeous?


 I would love to have a pantry like this.


We hiked down the 100+ stairs down to the beach to get some photos and see just what a feat it was to build this. Everything had to be hauled up that cliff as there were no roads out this far when it was built. Wow! And to think that 6 months or so out of the year the lighthouse keepers had to walk down to the beach to get water since their pipe line would be frozen. Human ingenuity and determination is pretty great, but I think my favorite part was seeing photos of storms in this area. One of them showed a wave crashing above the top of that cliff! Can you imagine? God's power is simply amazing.


I guess I will leave you here with this shot of my little girl who is growing up way too fast. I hope to get around to posting more often, but I can't make any promises. Too busy enjoying life, and that's OK with me. 


Till next time...
God's love and blessings!

Tuesday, March 17, 2015

Valentine Tea Party

Hello there! So I know it's not Valentine's Day, it's not even February anymore, but time just got away with me these last few weeks with all the fun kitchen renovations going on, along with some health issues I've been dealing with. I still wanted to share with you the fun little get-together my 11 year old planned, along with her two pals.

Our home school group has done a Valentine's party for the last several years, but this year, we weren't sure it was going to happen. Then Michelle and her 2 besties decided they would like to host a Valentine's Tea Party with their close friends. Their mom and I helped in the planning, but the girls did a lot of the work on their own.

I found this Valentine Crossword for the girls to do as the guests were arriving. They actually had more fun finding words in it that weren't on the list. They also brought Valentines to exchange with each other.
The chalkboard banner is from Stampin Up! The heart banner is one I made last year with a LOT of hearts we had punched out for another project and didn't end up using. I simply ran them through my sewing machine one after another. 

 The girls made little take-home favors for each of their friends.
Michelle's friends came over early the day of the party to help decorate and to make these heart shaped scones for our first course. It's amazing how hard it is to follow a recipe when you have multiple things going on at once. We may or may not have left the butter out of one of the batches. Thankfully, they all came out yummy!
The second course was peanut butter and jelly, and cucumber sandwiches. Apparently I didn't get any photos of those. For dessert, her friends brought these yummy Honey Cookies they made, and we all had fun dipping strawberries. YUM!
After the tea, we played a few minute-to-win-it games and a couple rounds of Bingo. 

Before the girls went home, my friend did a wonderful Bible study on God's love and our need of His forgiveness. He is, by far, our best Valentine! Speaking of Valentines and God's love, I will leave you with this cake I did for our February Fellowship Supper at church. My first attempt at a chalkboard cake. I enjoyed designing this one a lot.
Anyway, I better go. I've got some catch up work to do around the house.

Till next time...
God's love and blessings!

Wednesday, March 4, 2015

Kitchen Renovation

Hello there! This is going to be a super quick post with some fun pictures. My handsome hubby was off work this last week for winter break, so we decided to tackle a major item off our honey-do list: renovate the kitchen. Eeek! I still can't believe we started this, let alone how far we've gotten.

I've been dreaming for quite some time about opening up a window from the kitchen into the living room. I have, what I believe, is called a galley kitchen. It's long and narrow. Originally it had an eat-in breakfast nook, but since we never used it, and I desperately needed more storage, we added cabinets and beautiful display shelves at that end of the kitchen several years ago. You can read about it on this post. While my storage is OK now, I was getting really tired of feeling closed in and by myself when I am in there, and if you know anything about me, you know I am in there a LOT! I have also been dreaming of a large counter space. One where friends and family can sit and chat with me, and where there's room for more than one person to work. One where I can roll out fondant without bumping into the wall and where I can teach cake decorating classes. This week, I started seeing those dreams become a reality.

I think we're about 75% done, but most of the major work is finished so I thought I'd share some before and afters of where we are right now.

This is the main entry into the kitchen. This is also what Handsome Hubby and I see first thing in the morning when we exit our bedroom. One of the things I hadn't thought about before was the change in scenery with this reno. By moving the massively HUGE fridge to the other wall, we now have a straight shot out the window. I think I had a perma-grin the first morning I woke up to this. :o)
The stove was moved over into the fridge's spot. Thankfully, the contractors didn't mount the stove outlet into the wall. It is an extension cord coming out, so we simply had to slide it across the floor to it's new home. Do you see the gap between the two lower cabinets? In rearranging the cabinets, we ended up with about a 9 1/2 inch space. We looked at getting a cabinet to fill it, but it was going to be too expensive. We also thought about putting the two cabinets next to each other and simply having a smaller counter space, but I wasn't too keen on that idea. I'd like as much work space as I can get. We decided to space the two cabinets apart and build a shelf in there to house cookie sheets and our electric griddle, and an upper, pull-out shelf for bins of onions and potatoes. We're still debating on making a door for the spot or simply making a curtain to cover it. Also, the counter top is on order (bonus: it was on sale when we went in to order it!), so for now, we are using a fold up table as a counter.
Here you can see where most of the work was done. The fridge moved across the kitchen, the stove moved into the fridge's spot so we would have a place for the window. Another bonus, although you can't tell in this picture, is now I can see out the living room window from the kitchen as well. :o)
The table you see in the "before" picture below was built by my Handsome Hubby when we first moved in. It stores some of my cake decorating tools and was my main decorating area so it was always in this position, which takes up a lot of floor space. We are in the process of revamping the base of it for better storage, but I will no longer have to use it on a regular basis which means I will be able to tuck it in next to the fridge like you see in the "after" photo most of the time now.
And here's a picture looking in from the living room. I didn't get any "before" photos from this angle. The new counter will extend 18 inches into the living area creating a "breakfast bar".
We still have a bit of work ahead of us. I want to paint the kitchen, and will need to paint the living room wall as well. I can't decide if I want to paint it the same color it is, change the color and make it an accent wall, or repaint the whole living room. I'm having a hard enough time figuring out a paint color for the kitchen. Once the counter top comes in we will frame in the window. We are also working on the table in there and have some cabinet and shelf work to do. Oh, and some trim work as well. I'm already in love. Oh, and I've only tried to get milk out of the stove twice. ;o)

Well, this post ended up being longer than I planned. I will be back soon as I have some happenings I'd like to share that I just didn't have time for last week, and I promise to keep you updated on the kitchen progress.

Till next time...
God's love and blessings!

Thursday, January 15, 2015

Guest/Sewing Room Makeover

Hello there. I'm back. Did you miss me? I said in the last post that I'd show you where my awesome china cabinet now resides. It's not in the kitchen or dining room. It's in our guest/sewing room. What?!? Who says a piece of furniture has to be used for its intended purpose? It doesn't store china, but it is used for storage. I'll show you that in a bit.

First off, let's see what the room used to look like.

Um, yuck! When we first moved in, this was our son's room, and for a short period, it was my husband's office space. (The white rectangle on the wall is a fold up desk he used when he worked on other people's computers). Then it just kind of became a holding zone for things we didn't know what to do with as I re-organized other spaces in the house.

You can't see it very well in the above photo, but we never painted the inside of the closet. This is what most of the walls in the house looked like when we bought this place. GROSS!!! I have no idea what caused this, and no amount of scrubbing made it go away, but I was determined to get it painted this time.
We still don't know what that pipe sticking out of the wall is for.
This is my inspiration piece. I hoped to make this room both a guest room and sewing room. We made this cute piece at a Stampin' Up meeting, and I just loved it. It kind of has a sewing theme to it, and I love the colors.
All the walls (including the closet) got two coats of a soft yellow paint. Much better! This closet was going to be used for storing sewing material and miscellaneous craft supplies so the original closet rod and shelf wasn't going to work. I went back and forth trying to figure out how to put shelves in here, then, while we are at the store, we happened upon these metal ones and they were half off! With my husband's ingenuity, we made them fit. Woo hoo! You really don't want to see what it looks like right now. Let's just say those shelves are quite full.
This is the wall opposite the closet. The little houses on the wall house my thimble collection. Thought this was the perfect place for them. The houses were all bought at different yard sales and were all different colors so I just spray painted them a deep brown so they would play together a little nicer.
Apparently this bed is the perfect napping spot.
Look what I found at a yard sale the same time I was working on the china cabinet. Isn't it perfect? It's an old, chippy metal table with two leaves that pull out. The wood trim under the table was a very poorly done white paint job. My first intention was to sand it slightly to smooth it out a bit and just repaint it, but it wasn't working, so I used some paint stripper to remove all the paint and then stained the wood the same as the china cabinet.
Here it is with one of the leaves pulled out. The perfect spot to do some sewing.
And, here she is, as promised. My lovely china cabinet that is now a wrapping station and storage cabinet. Isn't she beautiful? The upper cabinets are holding some of my Bible study and various crafting books. My serger is the white ghost looking thing on the shelf. Some day I will make a proper cover for it, now that I know where all my sewing stuff is. ;o)
The bottom drawers are the perfect place for wrapping supplies. This drawer already had dividers in it for silverware, which works perfect for organizing ribbon and bows.
This drawer holds LOTS of tissue papers. It's so much easier to find just the right color now that I don't have to drag a box out of the closet (from under other boxes) to find them.
 And the bottom two drawers have LOTS of gift bags. All shapes, sizes and holidays.
One of the two side doors holds empty gift boxes, and the other holds sewing supplies. Speaking of sewing supplies, this little tea cabinet we got when we lived in Japan holds all my threads and other sewing tools. It's finally found a home. :o)
And, finally, here's where my inspiration piece ended up. Right now the table is up as a temporary holding spot for some of my flowers. The basket underneath holds a blanket I've been working on for about 5 years now. Sigh. I really should try and finish that up sometime.

Well, there you have it. A little tour of my summer time project. I have to say I am loving it. Before Christmas I spent many hours in here sewing some gifts for my daughter. I am hoping to get back in here soon to work on some other projects I have been asked to do. Sigh. So many crafts...so little time.


Monday, January 12, 2015

China Cabinet Makeover

Hello there! How are you this fine, chilly day? I just put some Nutella Hot Chocolate in the crock pot and can't wait to try it out later. Sounds warm and yummy. :o) 

This past summer I worked on a project that I'd been wanting to do for years. I was given this china cabinet from a dear friend when we were stationed in Japan. It was her grandmother's, but it just didn't fit in her home so she blessed me with it. Here you can see it when we first moved in to this house. Our formal dining room is open to the living room and doesn't have any walls for this to sit against so I tried using it in the breakfast nook. It didn't fit. :o( A few years ago we remodeled the kitchen and added cabinets to this corner so the china hutch went downstairs to act as a dresser for Michelle for a bit. That didn't work very well, so it eventually went in to storage. 
 I always knew I wanted to paint it someday. I wanted it to have an antique, distressed feel, not an old worn out one. This poor cabinet has been through a lot of moves, several families, a lot of kids, and it was showing a LOT of wear and tear.
 See what I mean? There's a difference between looking distressed and looking old.
Once our son moved out, I decided to turn his room into a guest room and wanted to use this cabinet in there for storage.

I started by removing the hardware. The strips of wood here were holding the glass in the upper doors. I used a flat head screwdriver to gently pry them out. Once the first one was out, the others came out pretty easily. I left the nails in the wood to re-attach them with later.
 Then the sanding began. Lots and lots of sanding. I knew I was going for a distressed look, so I didn't sand down to completely smooth wood, but I did want to get most of the smooth finish off so the paint would stick. You see those "louvered" doors? Whoever designed them did not plan on this piece ever being refinished...ever. (I really do not like this person.)
 Thankfully, I was able to use a palm sander for most of the surfaces. I planned on staining the top of this piece, so I did sand it down as far as I could and as smooth as I could starting with a rough grit and working to a super fine grit.
After sanding, I applied a very light, coat of blue paint. This was actually a mix of several different blues we had from various other projects around the house. I applied it in a very haphazard way, not worrying about complete coverage. This layer was just going to show through here and there so I didn't need to be super neat with it. I did, however, make sure there were not blobs or drips, especially at corners and in those louvers. 
The next layer of paint was a bit darker, though you can't tell by this photo. This one I tried to do a better job of covering and getting things smooth. 
This photo shows the color a little better.
Once all the parts were painted, I got out some sand paper and started sanding it down to expose the different layers underneath, getting down to bare wood in some places. I did NOT use the palm sander. I wanted to do it by hand so I could better control how much sanded off and where. I focused on taking off more around edges where it would naturally wear more.
Top drawer sanded, bottom drawer not.
Then I used disposable sponge brushes to brush on some minwax stain and cotton rags to wipe it off. I wiped on a large area, but not too large. After doing an area like this, I made sure to use the rag and wipe the overlapping areas really well to blend in the stain and not have any lines.
Side note, if you have really long hair like I do, make sure it is pinned up so you don't end up with a new color. Oh, and stock up on disposable gloves too. You'll need them. 
The painted areas only received one coat of stain, but I think I used 3 coats on the top. 
Here you can see the different layers of paint and how the stain helped darken both the paint colors and the exposed wood. 
Although the stain I used was a stain and sealer, I did use a wipe on sealer on top of this anyway, just to give it some more protection. The final step was to figure out what hardware went where and put everything back together.
 Oops, forgot to paint the trim that holds the glass inside the door. Oh well. Not going to worry about it now. I simply lined the nails up with the holes that were already there and tapped them into place.
Here it is all done and waiting for my handsome hubby to come home and help me move it into the house. 
 First I had to put it in the yard to get a good shot in the sunshine. Love.
I will show you it in its new home, but that will have to wait till later as I need to get started on dinner. We're having Creamy Pesto and Chicken Pasta. So yummy!!

Till next time...
God's love and blessings!